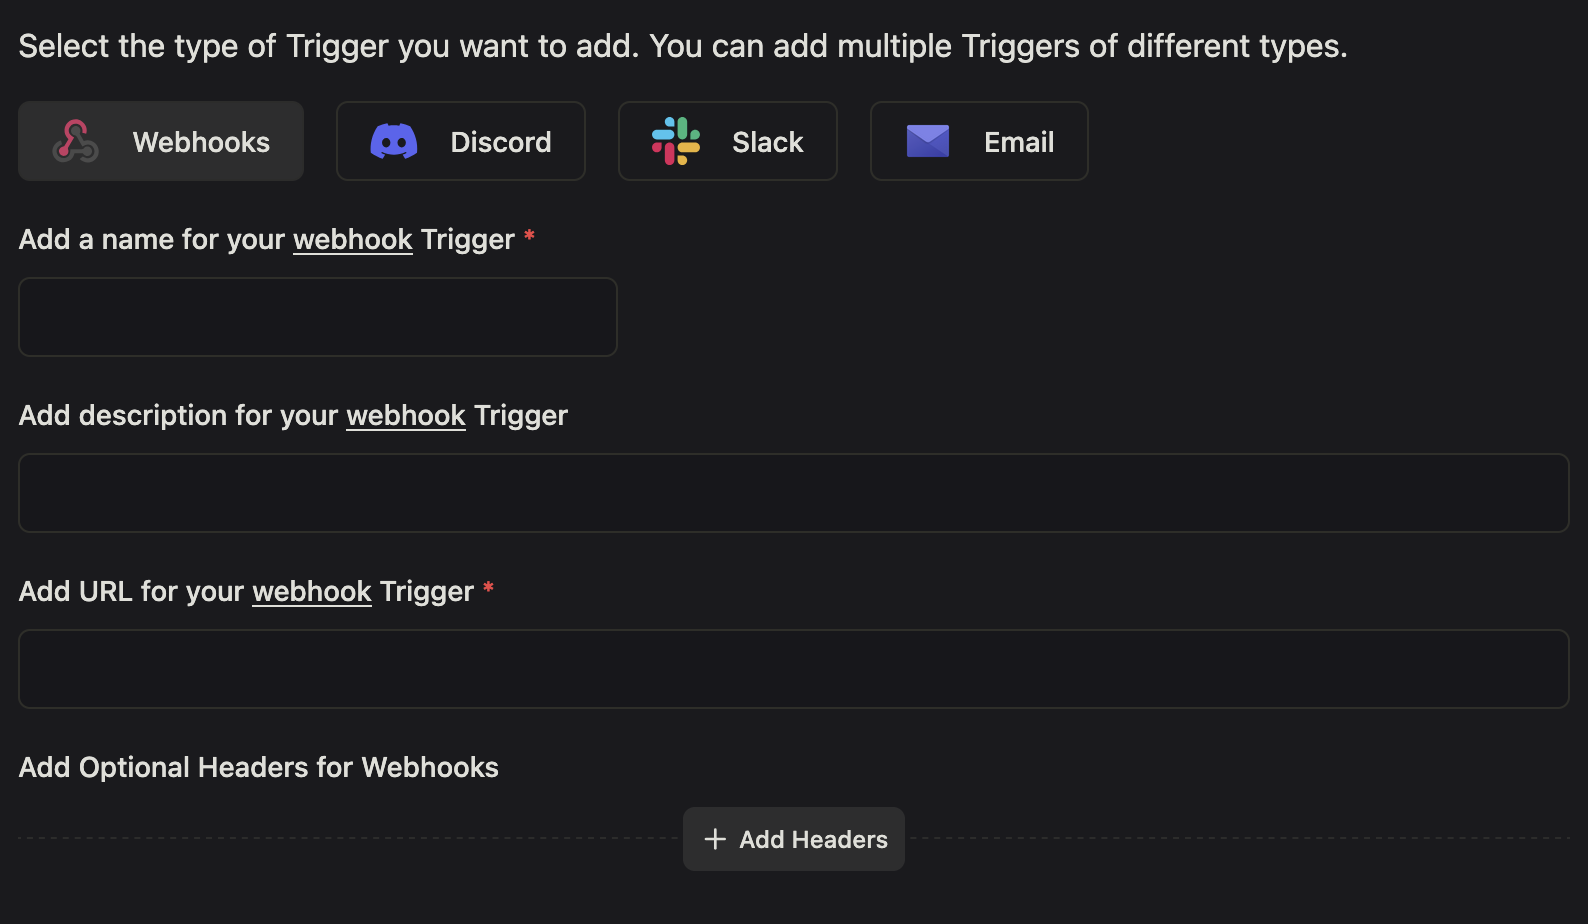
Triggers
Triggers are used to trigger actions based on the status of your monitors. You can use triggers to send notifications, or call webhooks when a monitor goes down or up.
Name
REQUIREDThe name is used to define the name of the webhook. It is required and has to be a string.
Description
The description is used to define the description of the webhook. It is optional and has to be a string.
Kener supports the following triggers:
Trigger Variables
You can use the following variables in the triggers using mustache syntax.
| Key | Description | Mustache Variable |
|---|---|---|
| site_name | [string] Name of your site | {{site_name}} |
| logo_url | [string] Logo of your site | {{logo_url}} |
| site_url | [string] Url of your site | {{site_url}} |
| alert_name | [string] Name of the alert | {{alert_name}} |
| status | [string] Status of the alert. Can be TRIGGERED, RESOLVED |
{{status}} |
| is_resolved | [bool] True if alert is RESOLVED |
{{is_resolved}} |
| is_triggered | [bool] True if alert is TRIGGERED |
{{is_triggered}} |
| description | [string] Description of the alert. | {{description}} |
| action_text | [string] CTA for next action on the alert | {{action_text}} |
| action_url | [string] URL for next action on the alert | {{action_url}} |
| metric | [string] Name of the monitor | {{metric}} |
| severity | [string] Severity of the alert. Can be critical, warn |
{{severity}} |
| id | [string] Id of the alert | {{id}} |
| current_value | [number] Current count of failures | {{current_value}} |
| threshold | [number] Threshold Failue | {{threshold}} |
| source | [string] Source of the alert | {{source}} |
| timestamp | [string] Timestamp ISO 8601 formatted | {{timestamp}} |
Webhook
Webhook triggers are used to send a HTTP POST request to a URL when a monitor goes down or up.

URL
REQUIREDThe URL is used to define the URL of the webhook. It is required and has to be a valid URL.
You can also pass secrets that are set in the environment variables.
Example: https://example.com/webhook?secret=$SECRET_X. Make sure $SECRET_X is set in the environment variables.
Method
Method will always be POST
Headers
The headers are used to define the headers that should be sent with the request. It is optional and has to be a valid JSON object. You can add secrets that are set in the environment variables.
Example: Authorization: Bearer $SECRET_Y. Make sure $SECRET_Y is set in the environment variables.
While sending webhook kener will add two more headers: Content-Type: application/json and User-Agent: Kener/3.0.0.
Body
Body of the webhook will be sent as below:
{
    "id": "mockoon-9",
    "alert_name": "Mockoon DOWN",
    "severity": "critical",
    "status": "TRIGGERED",
    "source": "Kener",
    "timestamp": "2024-11-27T04:55:00.369Z",
    "description": "🚨 **Service Alert**: Check the details below",
    "details": {
        "metric": "Mockoon",
        "current_value": 1,
        "threshold": 1
    },
    "actions": [
        {
            "text": "View Monitor",
            "url": "https://kener.ing/monitor-mockoon"
        }
    ]
}
Custom Body
Using mustache variables you can customize the body of the webhook. If you are not using a json body then please make sure you are using the right content-type by setting custom headers.
Examples
1. Telegram
You can use the webhook trigger to send a message to a telegram channel. Enable Use a custom webhook body.
Set the URL to https://api.telegram.org/bot[BOT_TOKEN]/sendMessage. Replace [BOT_TOKEN] with your bot token.
{
    "chat_id": "[CHAT_ID]", // Replace [CHAT_ID] with your chat id
    "text": "<b>{{alert_name}}</b>\n\n<b>Severity:</b> <code>{{severity}}</code>\n<b>Status:</b> {{status}}\n<b>Source:</b> Kener\n<b>Time:</b> {{timestamp}}\n\n📌 <b>Details:</b>\n- <b>Metric:</b>{{metric}}\n- <b>Current Value:</b> <code>{{current_value}}</code>\n- <b>Threshold:</b> <code>{{threshold}}</code>\n\n🔍 <a href=\"{{action_url}}\">{{action_text}}</a>",
    "parse_mode": "HTML"
}
If you want to send a message to a group, then replace [CHAT_ID] with the group id.
You can also use environment variables to store the bot token and chat id. In that case the URL will be https://api.telegram.org/bot$BOT_TOKEN/sendMessage. In the body you can use "chat_id": "$CHAT_ID". Make sure you have set the BOT_TOKEN and CHAT_ID in the environment variables.
2. Conditional Webhook
You can use is_triggered and is_resolved to create conditional webhooks.
{
    "title": "Monitor Alert for {{metric}} has been {{#is_triggered}}🔴 Triggered{{/is_triggered}}{{#is_resolved}}🟢 Resolved{{/is_resolved}}. Current value is {{current_value}} and threshold set is {{threshold}}"
}
The output will be
{
    "title": "Monitor Alert for Mockoon has been 🔴 Triggered. Current value is 1 and threshold set is 1"
}
{
    "title": "Monitor Alert for Mockoon has been 🟢 Resolved. Current value is 0 and threshold set is 1"
}
3. Combing mustache with env variables
Combine the above example with NODE_ENV environment variable.
{
    "title": "Monitor Alert for {{metric}} in environment $NODE_ENV has been {{#is_triggered}}🔴 Triggered{{/is_triggered}}{{#is_resolved}}🟢 Resolved{{/is_resolved}}. Current value is {{current_value}} and threshold set is {{threshold}}."
}
Discord
Discord triggers are used to send a message to a discord channel when a monitor goes down or up.
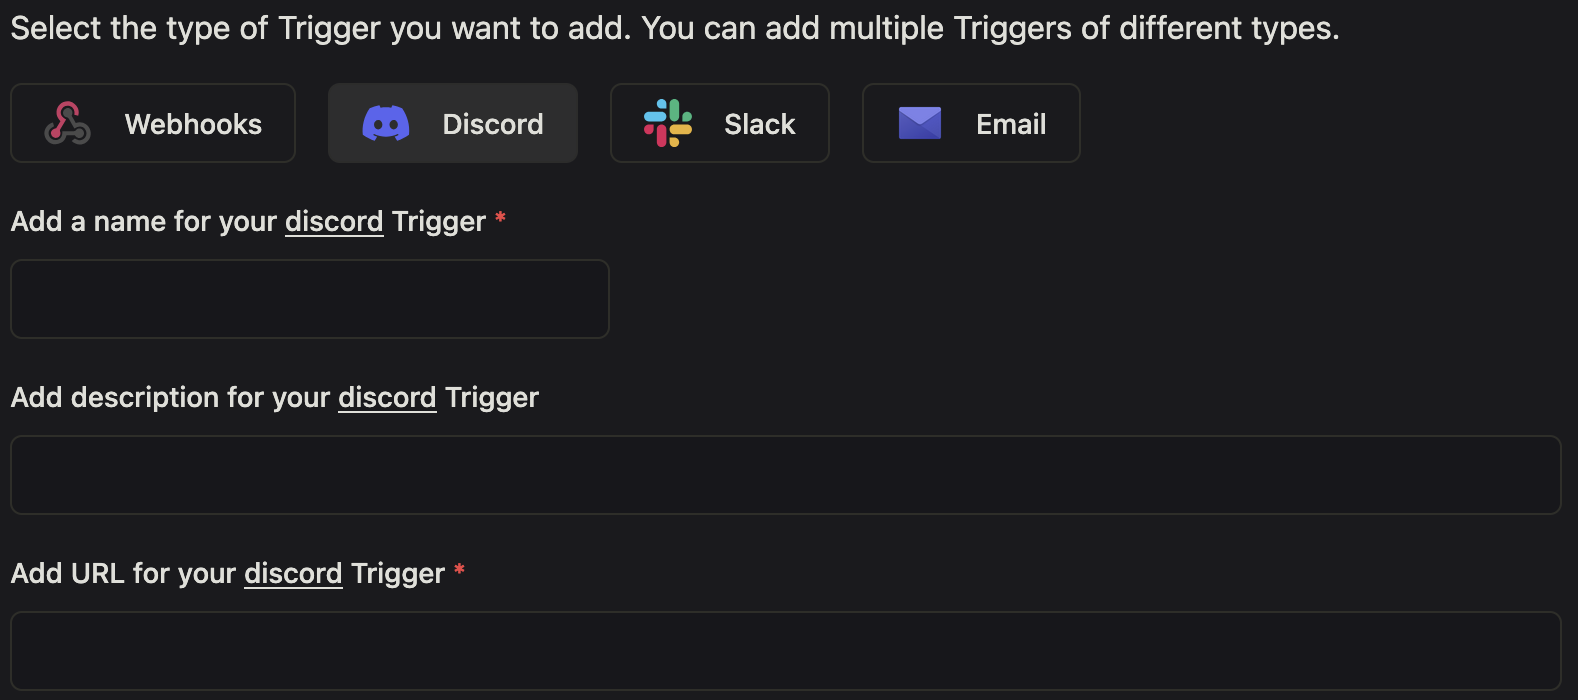
Discord URL
REQUIREDThe Discord URL is used to define the URL of the discord webhook. It is required and has to be a valid URL.
How to get the Discord URL?
- Go to your discord server
- Right-click on the channel you want to send the messages
- Click on
Edit Channel - Go to
Integrations - Click on
Create Webhook - Copy the URL
Discord Message
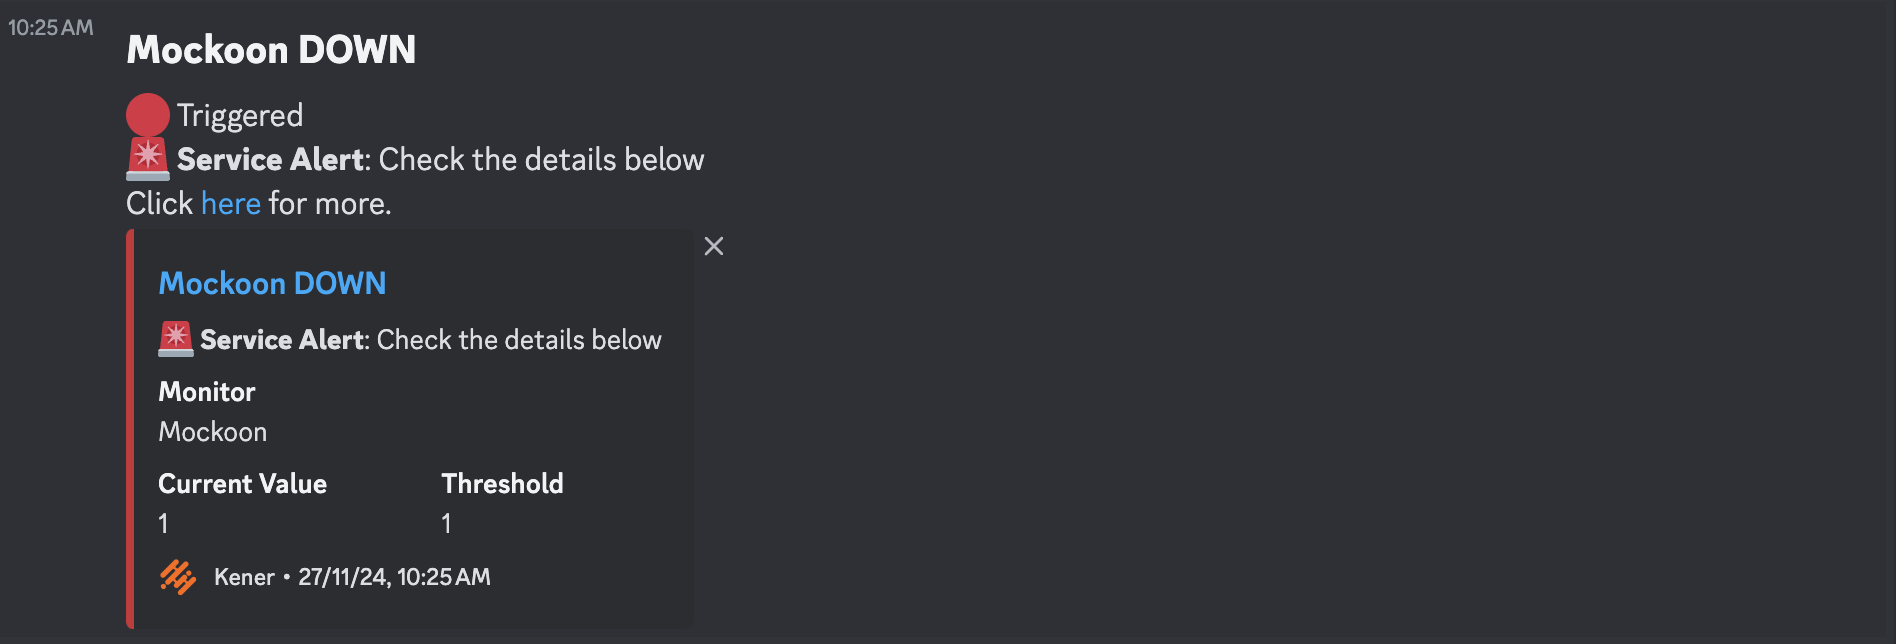
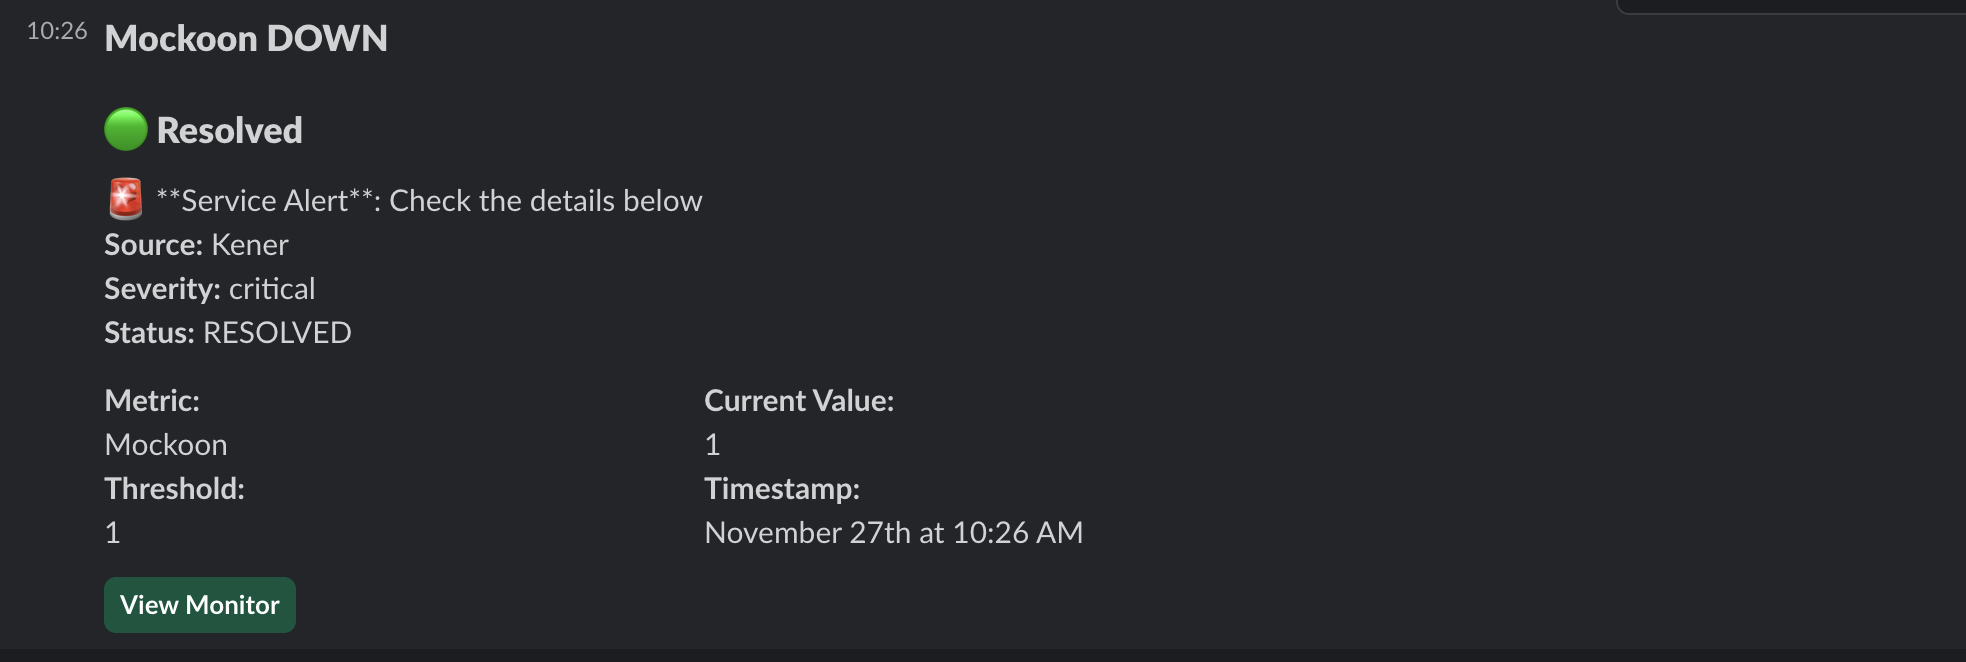
The discord message when alert is TRIGGERED will look like this
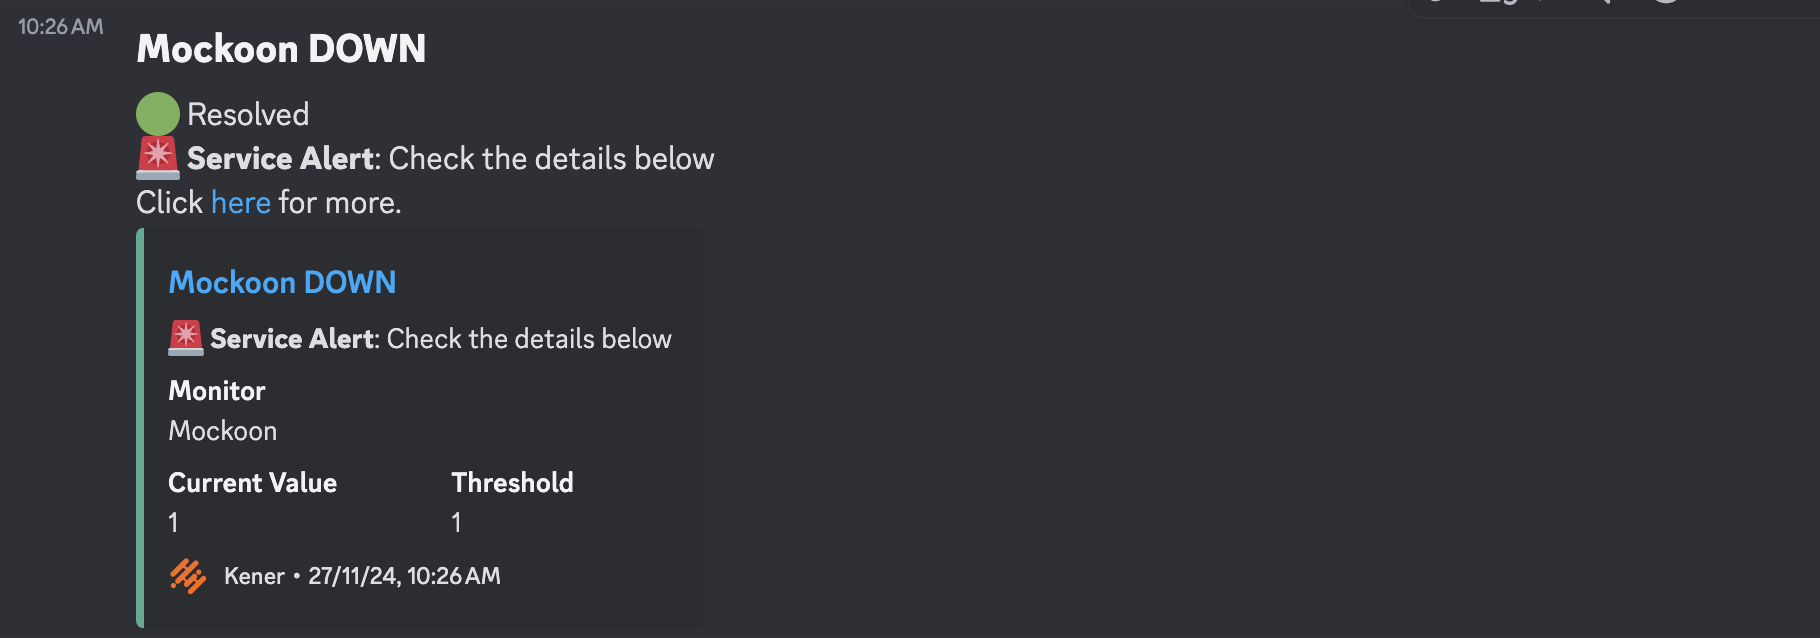
The discord message when alert is RESOLVED will look like this
Modify Discord Message
You can modify the discord message by using mustache variables.
{
    "username": "{{site_name}}",
    "avatar_url": "{{{logo_url}}}",
    "content": "## {{alert_name}}\n{{#is_triggered}}🔴 Triggered{{/is_triggered}}{{#is_resolved}}🟢 Resolved{{/is_resolved}}\n{{description}}\nClick [MY CTA]({{{action_url}}}) for more.",
    "embeds": [
        {
            "title": "❌{{alert_name}}❌",
            "description": "{{description}}",
            "url": "{{{action_url}}}",
            "color": "{{#is_triggered}}13250616{{/is_triggered}}{{#is_resolved}}5156244{{/is_resolved}}",
            "fields": [
                {
                    "name": "Monitor",
                    "value": "{{metric}}",
                    "inline": false
                },
                {
                    "name": "Severity",
                    "value": "{{severity}}",
                    "inline": false
                },
                {
                    "name": "Alert ID",
                    "value": "{{id}}",
                    "inline": false
                },
                {
                    "name": "Current Value",
                    "value": "{{current_value}}",
                    "inline": true
                },
                {
                    "name": "Threshold",
                    "value": "{{threshold}}",
                    "inline": true
                }
            ],
            "footer": {
                "text": "{{source}}",
                "icon_url": "{{{logo_url}}}"
            },
            "timestamp": "{{timestamp}}"
        }
    ]
}
Slack
Slack triggers are used to send a message to a slack channel when a monitor goes down or up.

Slack URL
REQUIREDThe Slack URL is used to define the URL of the slack webhook. It is required and has to be a valid URL.
How to get the Slack URL?
- Go to your slack workspace
- Click on
Appson the left sidebar - Search for
Incoming Webhooks - Click on
Add to Slack - Select the channel you want to send the messages
- Click on
Add Incoming Webhook Integration - Copy the URL
Slack Message
The slack message when alert is TRIGGERED will look like this

The slack message when alert is RESOLVED will look like this
Modify Slack Message
You can modify the slack message by using mustache variables.
{
    "blocks": [
        {
            "type": "header",
            "text": {
                "type": "plain_text",
                "text": "Hello Alert {{alert_name}}",
                "emoji": true
            }
        },
        {
            "type": "header",
            "text": {
                "type": "plain_text",
                "text": "{{#is_triggered}}🔴 Triggered{{/is_triggered}}{{#is_resolved}}🟢 Resolved{{/is_resolved}}",
                "emoji": true
            }
        },
        {
            "type": "section",
            "text": {
                "type": "mrkdwn",
                "text": "{{description}}\n*Source:* {{source}}\n*Severity:* {{severity}}\n*Status:* {{status}}"
            }
        },
        {
            "type": "section",
            "fields": [
                {
                    "type": "mrkdwn",
                    "text": "*Metric:*\n{{metric}}"
                },
                {
                    "type": "mrkdwn",
                    "text": "*Current Value:*\n{{current_value}}"
                },
                {
                    "type": "mrkdwn",
                    "text": "*Threshold:*\n{{threshold}}"
                },
                {
                    "type": "mrkdwn",
                    "text": "*Environment:*\n$_NODE_ENV"
                },
                {
                    "type": "mrkdwn",
                    "text": "*Timestamp:*\n<!date^{{timestamp_unix}}^{date} at {time}|{{timestamp}}>"
                }
            ]
        },
        {
            "type": "actions",
            "elements": [
                {
                    "type": "button",
                    "text": {
                        "type": "plain_text",
                        "text": "{{action_text}}"
                    },
                    "url": "{{{action_url}}}",
                    "style": "primary"
                }
            ]
        }
    ]
}
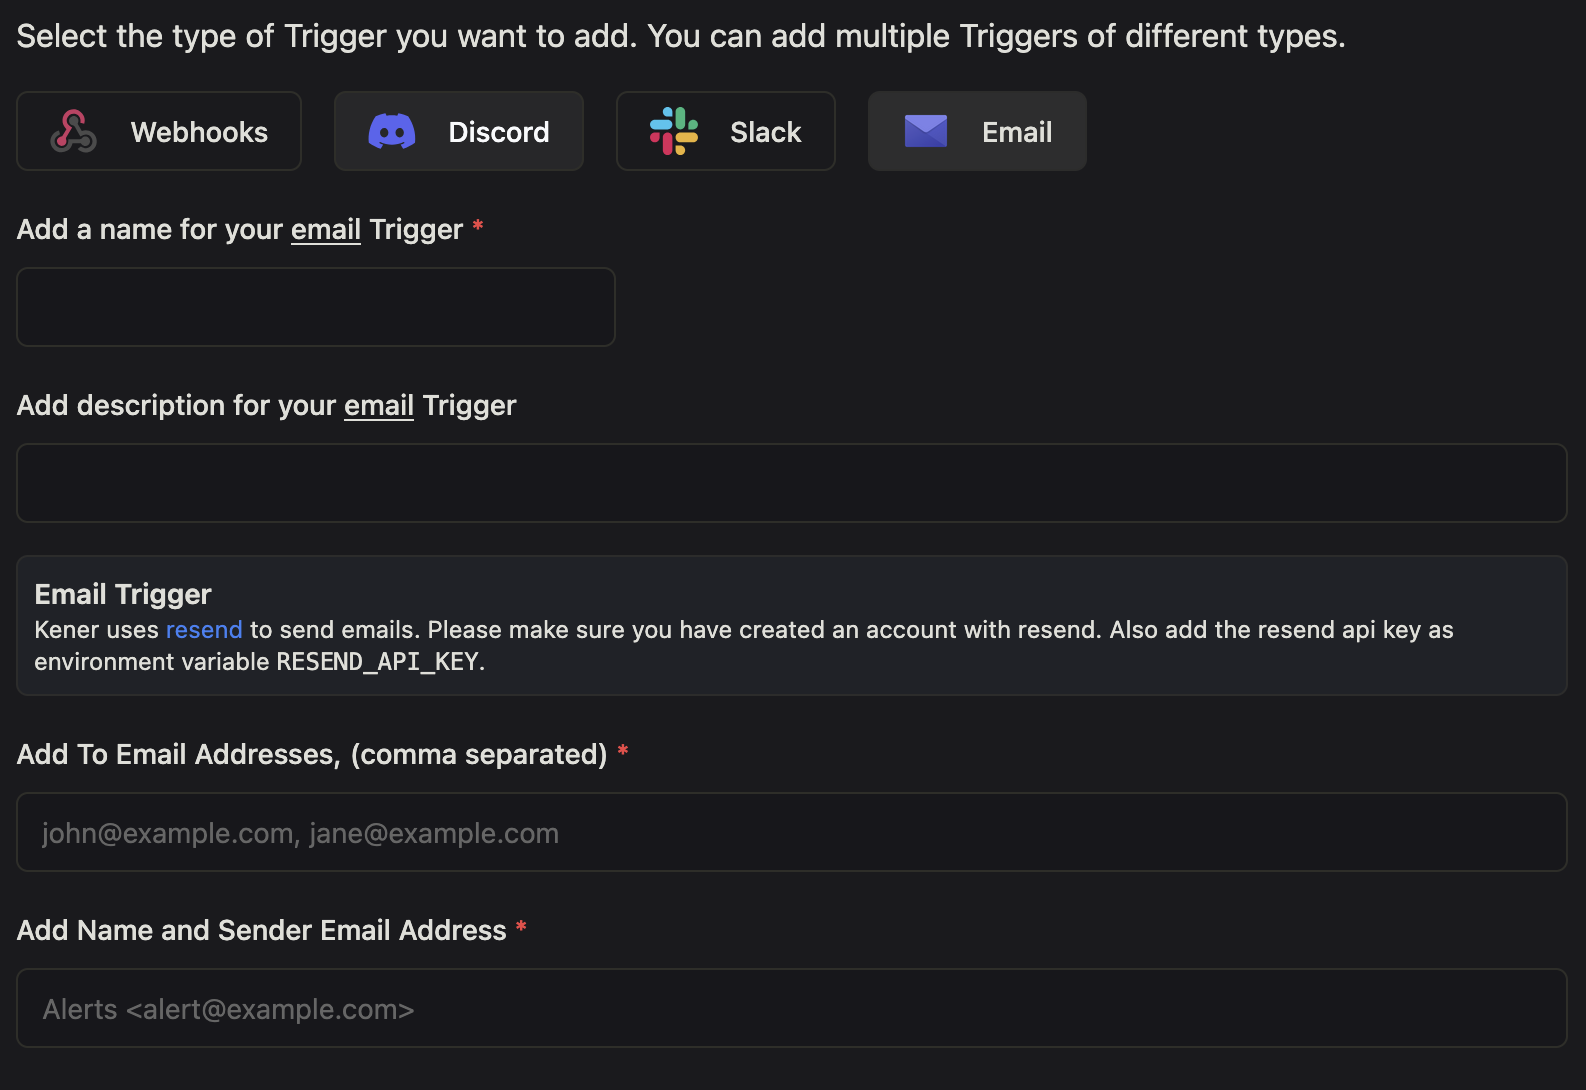
Email triggers are used to send an email when a monitor goes down or up. Kener supports sending emails via resend or over SMTP.
Resend
To send emails using Resend you just need to set RESEND_API_KEY in the environment variables.
SMTP
To send emails using SMTP, please enter
- Host: SMTP server host
- Port: SMTP server port
- User: SMTP server username
- Password: SMTP server password
Since the password will be stored as plain text we encourage to use environment variables for the password. Let us say if you have an environment variable SMTP_PASSWORD then you can use it as $SMTP_PASSWORD.
If your SMTP provider does require username and password, you can set SMTP_USER and SMTP_PASS to -.
To
REQUIREDThe email addresses to which the email should be sent. It is required and has to be a valid email addresses. You can pass multiple email addresses separated by a comma.
Sender
The email address from which the email should be sent.
It should be in the format Name <email@address.com>
If you have not connected your domain with resend, then use Some Name <onboarding@resend.dev>
Subject
Subject of the email when TRIGGERED
[TRIGGERED] Mockoon DOWN at 2024-12-27T04:42:01.430Z
Subject of the email when RESOLVED
[RESOLVED] Mockoon DOWN at 2024-12-27T04:42:01.430Z
Body
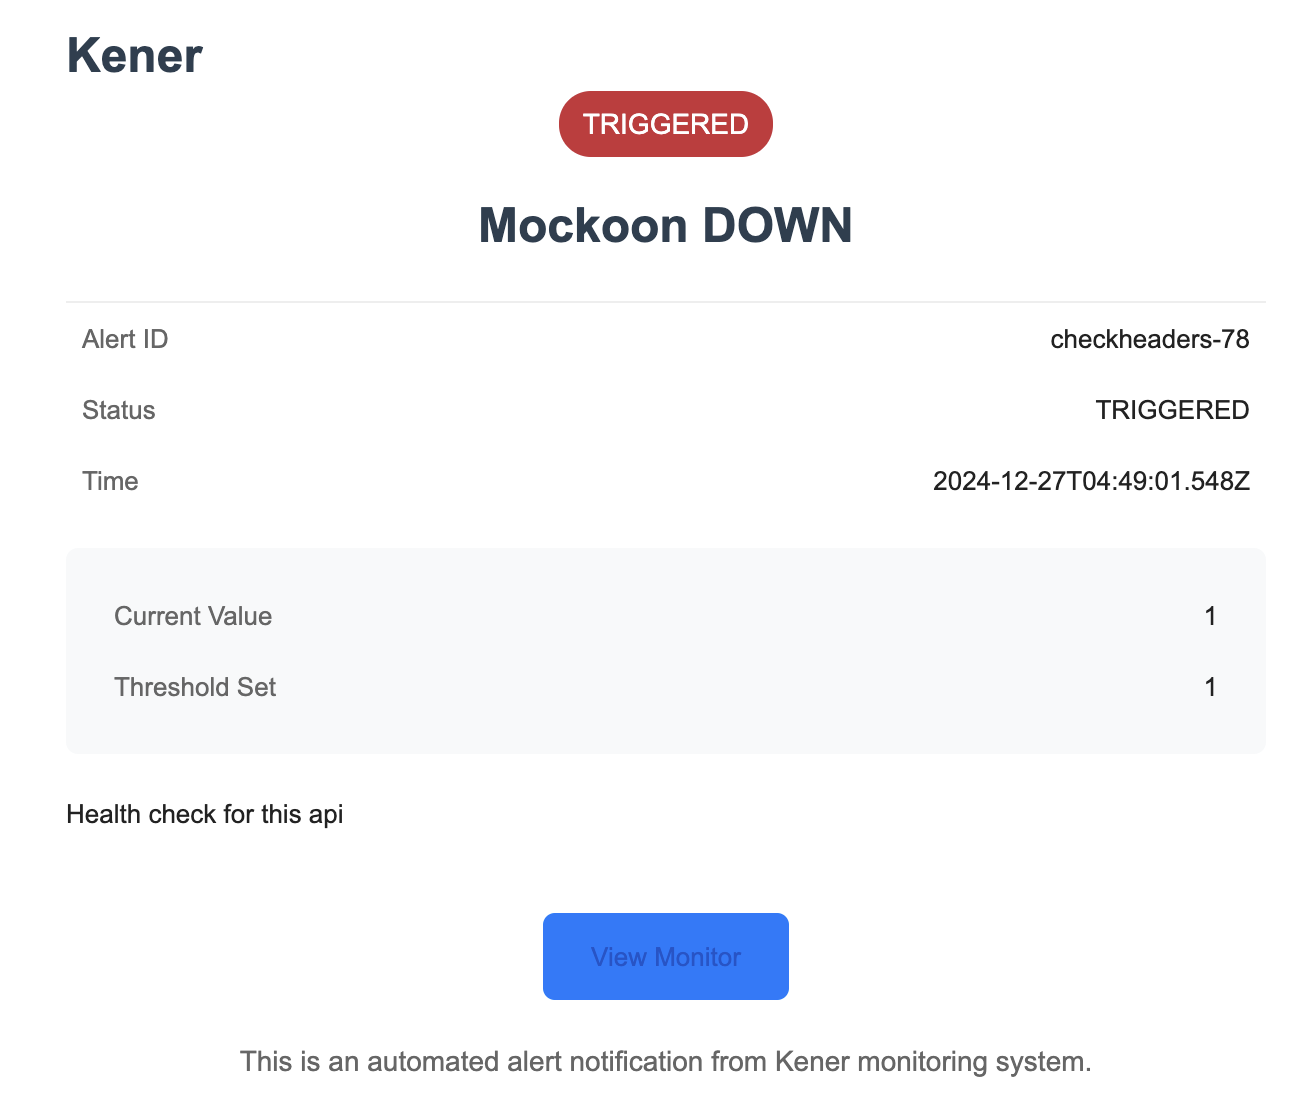
The emaik message when alert is TRIGGERED will look like this
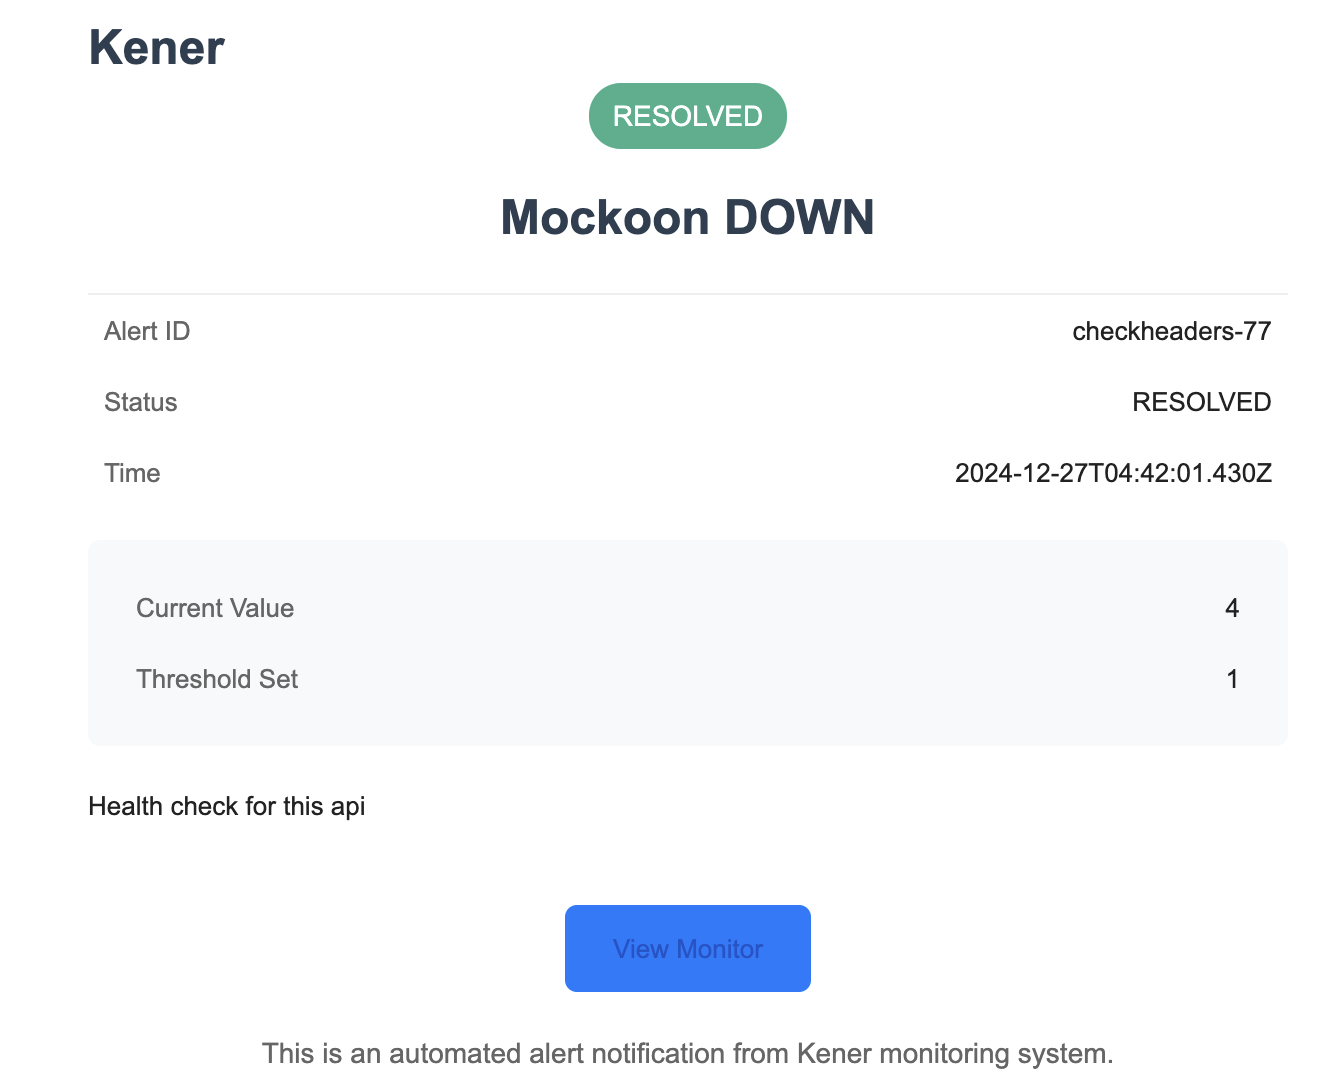
The emaik message when alert is RESOLVED will look like this
Edit Triggers
Click on the ⚙️ to edit the trigger.
Deactivate Trigger
You can deactivate the trigger by switching the toggle to off. You cannot send message to a deactivated trigger. Any monitor with this trigger will not send any notifications.